キャラクタLCD表示用ライブラリ
秋月電子のI2C接続小型キャラクタLCD(AQM1602XA)を利用するための表示用ライブラリを作ることにした
電子負荷の消費電流および電源電圧の表示部を作製しようとしたところ今後も良く使いそう(毎日でないので使い方を忘れてしまうから)なのでライブラリにしておこうと考えた訳である
ライブラリ化する方法と注意点
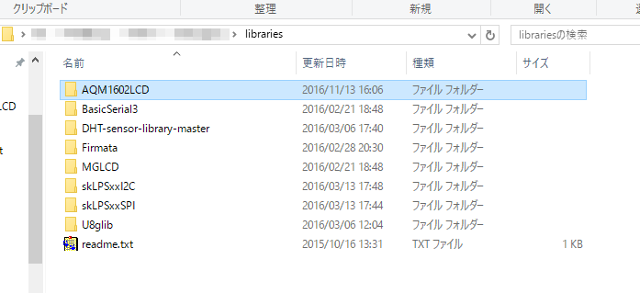
- ライブラリはIDEの環境設定で指定したフォルダに新規のライブラリフォルダを作ってファイルを置く
- 必要ファイルは,XXX.hとXXX.cppとなる(その他は無くても問題なし,.cではダメだった)
- XXXは同じでなくてはならない
- 新規のライブラリフォルダ名はXXXでなくても良い


AQM1602LCD.h
#define _AQM1602_H_
#if ARDUINO >= 100
 #include "Arduino.h"
#else
 #include "WProgram.h"
#endif

#define LCD_ADDR 0x3E

void LCD_clearScreen(void);
void LCD_setLocate(int col, int row);
void LCD_putChar(byte c);
void LCD_putString(byte *str);
void LCD_init3();
void LCD_init5();
#endif /* AQM1602LIB_H */
AQM1602LCD.cpp
// LCD_init3        - LCDの初期化(3.3V)
// LCD_init5        - LCDの初期化(5V)
//
// LCD_clearScreen  - LCDモジュールの画面をクリア
// LCD_setLocate    - LCDモジュール画面内のカーソル位置を移動
// LCD_putChar      - LCDにデータを1バイト出力
// LCD_putString    - LCDに文字列データを出力
//

#include <Wire.h>
#include "AQM1602LCD.h"

// LCDにコマンドを送信
//
static void LCD_writeCommand(byte command) {
    Wire.beginTransmission(LCD_ADDR);    // スタートコンディション
    Wire.write(0x00);                    // control byte の送信(コマンドを指定)
    Wire.write(command);                // command byte の送信
    Wire.endTransmission();                // ストップコンディション
    delay(10);
}

// LCDにデータを送信
//
static void LCD_writeData(byte data) {
    Wire.beginTransmission(LCD_ADDR);    // スタートコンディション
    Wire.write(0x40);                    // control byte の送信(データを指定)
    Wire.write(data);                    // data byte の送信
    Wire.endTransmission();                // ストップコンディション
    delay(1);
}

// LCDの初期化
//
static void LCD_init(int volt) {
    Wire.begin();

    delay(100);
    LCD_writeCommand(0x38); delay(20);        // Function set
    LCD_writeCommand(0x39); delay(20);        // IS=1
    LCD_writeCommand(0x14); delay(20);        // Internal OSC frequency

    if(volt == 3) {
        // 3.3V
        LCD_writeCommand(0x73); delay(20);    // Contrast set
        LCD_writeCommand(0x56); delay(20);    // POWER/ICON/Contrast control
    } else /* if(volt == 5) */ {
        // 5V
        LCD_writeCommand(0x7A); delay(20);    // Contrast set
        LCD_writeCommand(0x52); delay(20);    // POWER/ICON/Contrast control
    }
    LCD_writeCommand(0x6C); delay(20);        // Follower control
    LCD_writeCommand(0x38); delay(20);        // Function set
    LCD_writeCommand(0x01); delay(20);        // Clear Display
    LCD_writeCommand(0x0C); delay(20);        // Display ON
    LCD_writeCommand(0x06); delay(20);        // Entry Mode
}

// LCDの初期化(3.3V)
//
void LCD_init3() {
    LCD_init(3);
}

// LCDの初期化(5V)
//
void LCD_init5() {
    LCD_init(5);
}

// LCDモジュールの画面をクリア
//
void LCD_clearScreen(void) {
    LCD_writeCommand(0x01);                // Clear Display
}

// LCDモジュール画面内のカーソル位置を移動
//    col : 横(列)方向のカーソル位置(0-15)
//    row : 縦(行)方向のカーソル位置(0-1)
//
void LCD_setLocate(int col, int row) {
    static int row_offsets[] = { 0x00, 0x40 } ;
    // Set DDRAM Adddress : 00H-0FH,40H-4FH
    LCD_writeCommand(0x80 | (col + row_offsets[row]));
}

// LCDにデータを1バイト出力
//      c :  出力する文字データを指定
//
void LCD_putChar(byte c) {
    LCD_writeData(c);
}

// LCDに文字列データを出力
//    str :  出力する文字列
//
void LCD_putString(byte *str) {
    while(*str) LCD_writeData(*str++);
}
ライブラリインタフェースはコメントのとおり
ヘッダーファイルの
#include "Arduino.h"
を,忘れがちなので忘れないようにする事
(追加:2017.01.22)
C++に書き換えた
注意点
- コンストラクタで電圧の指定とかやってみたが上手く動作しないので保留(現状はsetup()を呼び出す仕様)
- 割込み禁止で使うとハングアップするようだ
- C版も使用しているので名称を変更
AQMI2CLCD.h
//秋月電子通商 I2C接続小型キャラクタLCDモジュール
//    AQM0802A-RN-GBW(8x2行)
//    AQM0802A-FLW-GBW(8x2行,バックライト付)
//    AQM1602XA-RN-GBW(16x2行)
//
//Sitronix ST7032 CONTROLED
//    電源電圧:2.7~5.5V
//    インターフェース:I2C
//    I2Cアドレス:0x3E
//    I2Cスピード: 最大400kHz
//    使用可能温度:-30~+85℃
//
#ifndef _AQMI2CLCD_H_
#define _AQMI2CLCD_H_
#if ARDUINO >= 100
 #include <Arduino.h>
#else
 #include <WProgram.h>
#endif

#define AQMI2CLCD_ADDR 0x3E

class AQMI2CLCD {
    public:
//        AQMI2CLCD();
        void setup();
        void setup(int);
        void clearScreen(void);
        void setLocate(int, int);
        void putChar(char);
        void putString(char *);
        void putString(int);
};

#endif /* AQMI2CLCD_H */
AQMI2CLCD.cpp
//秋月電子通商 I2C接続小型キャラクタLCDモジュール
//
// コンストラクタ
// void AQMI2CLCD()
//
// void setup
// void setup(int)
//        3        - LCDの初期化(3.3V)
//        5        - LCDの初期化(5V)
// void clearScreen    - LCDモジュールの画面をクリア
// void setLocate    - LCDモジュール画面内のカーソル位置を移動
// void putChar        - LCDにデータを1バイト出力
// void putString    - LCDに文字列データを出力
//
#include <AQMI2CLCD.h>
#include <Wire.h>

//AQMI2CLCD::AQMI2CLCD() {}

// LCDにコマンドを送信
//
static void LCD_writeCommand(byte command) {
    Wire.beginTransmission(AQMI2CLCD_ADDR);    // スタートコンディション
    Wire.write(0x00);                        // control byte の送信(コマンドを指定)
    Wire.write(command);                    // command byte の送信
    Wire.endTransmission();                    // ストップコンディション
    delay(10);
}

// LCDにデータを送信
//
static void LCD_writeData(byte data) {
    Wire.beginTransmission(AQMI2CLCD_ADDR);    // スタートコンディション
    Wire.write(0x40);                        // control byte の送信(データを指定)
    Wire.write(data);                        // data byte の送信
    Wire.endTransmission();                    // ストップコンディション
    delay(1);
}

// LCDの初期化
//
static void LCD_init(int volt) {
    Wire.begin();

    delay(100);
    LCD_writeCommand(0x38); delay(20);        // Function set
    LCD_writeCommand(0x39); delay(20);        // IS=1
    LCD_writeCommand(0x14); delay(20);        // Internal OSC frequency

    if(volt == 3) {
        // 3.3V
        LCD_writeCommand(0x73); delay(20);    // Contrast set
        LCD_writeCommand(0x56); delay(20);    // POWER/ICON/Contrast control
    } else /* if(volt == 5) */ {
        // 5V
        LCD_writeCommand(0x7A); delay(20);    // Contrast set
        LCD_writeCommand(0x52); delay(20);    // POWER/ICON/Contrast control
    }
    LCD_writeCommand(0x6C); delay(20);        // Follower control
    LCD_writeCommand(0x38); delay(20);        // Function set
    LCD_writeCommand(0x01); delay(20);        // Clear Display
    LCD_writeCommand(0x0C); delay(20);        // Display ON
    LCD_writeCommand(0x06); delay(20);        // Entry Mode
}

// LCDセットアップ
//
void AQMI2CLCD::setup() {
    LCD_init(5);
}
void AQMI2CLCD::setup(int volt) {
    LCD_init(volt);
}

// LCDモジュールの画面をクリア
//
void AQMI2CLCD::clearScreen(void) {
    LCD_writeCommand(0x01);                // Clear Display
}

// LCDモジュール画面内のカーソル位置を移動
//    col : 横(列)方向のカーソル位置(0-15)
//    row : 縦(行)方向のカーソル位置(0-1)
//
void AQMI2CLCD::setLocate(int col, int row) {
    static int row_offsets[] = { 0x00, 0x40 } ;
    // Set DDRAM Adddress : 00H-0FH,40H-4FH
    LCD_writeCommand(0x80 | (col + row_offsets[row]));
}

// LCDにデータを1バイト出力
//      c :  出力する文字データを指定
//
void AQMI2CLCD::putChar(char c) {
    LCD_writeData(c);
}

// LCDに文字列データを出力
//    str :  出力する文字列
//
void AQMI2CLCD::putString(char *str) {
    while(*str) LCD_writeData(*str++);
}
void AQMI2CLCD::putString(int n) {
    char bf[16];
    sprintf(bf, "%d\0", n);
    char *str = bf;
    while(*str) LCD_writeData(*str++);
}
予告なく改良

